Appearance
Hello RabbitMQ
1. 队列模型
RabbitMQ 官方文档列举了 5 种队列模型:
基本消息队列:
图 1.1 - 基本消息队列 工作消息队列:
图 1.2 - 工作消息队列 默认情况下 RabbitMQ 不会限制消费者未确认的消息数量。即默认情况下 RabbitMQ 会尽可能快地将队列中的消息推送给消费者,在多个消费者订阅同一队列时,如果其中某个消费者处理能力有限,可能导致该消费者在内存中堆积大量消息,而其他消费者空闲。从而导致消息处理延迟,降低整体系统效率。
通过设置 prefetch count,可以有效控制消息的流量,避免消费者因处理能力有限而被过多的消息淹没,提高系统的整体吞吐量。具体配置方式请参考 RabbitMQ 客户端限流。
发布订阅:
图 1.3 - 发布订阅 Fanout Exchange 会将接收到的消息路由到每一个跟其绑定的 Queue。
路由:
图 1.4 - 路由 Direct Exchange 根据消息的 Routing Key(路由键)将消息精确匹配地路由到一个或多个绑定队列。队列绑定到交换机时需要指定一个或多个 Routing Key,只有当消息的 Routing Key 与队列绑定的某个 Routing Key 完全匹配时,消息才会路由到该队列。
主题:
图 1.5 - 主题 Topic Exchange 根据消息的 Routing Key 和绑定时的 Pattern(模式)进行路由。队列绑定到交换机时使用通配符(
*表示单个单词,#表示零个或多个单词)来定义匹配规则。消息的 Routing Key 由多个单词组成,各单词之间使用.进行分割。
警告
Exchange 只负责消息路由,不负责存储,当消息路由失败即丢失。
2. 端口说明
RabbitMQ 端口说明如下:
4369:用于 EPMD(Erlang Port Mapper Daemon),Erlang 节点发现服务;5671:AMQP 协议的 TLS/SSL 端口,客户端通过此端口进行安全连接;5672:AMQP 协议默认端口,客户端通过此端口连接 RabbitMQ(未启用 TLS);15672:管理界面的 HTTP API 端口,用于访问 RabbitMQ 管理插件;25672:用于 Erlang 分布式的集群节点通信(Erlang Distribution Port)。
3. 基础代码示例
生产者:
Javapublic static void main(String[] args) { String queueName = "simple.queue"; String message = "Hello RabbitMQ"; ConnectionFactory factory = new ConnectionFactory(); factory.setHost("your_hostname"); factory.setPort(5672); factory.setVirtualHost("/"); factory.setUsername("your_username"); factory.setPassword("your_password"); try (Connection connection = factory.newConnection(); Channel channel = connection.createChannel()) { channel.queueDeclare(queueName, false, false, false, null); channel.basicPublish("", queueName, null, message.getBytes()); System.out.println(" [x] Sent '" + message + "'"); } catch (Exception e) { e.printStackTrace(); } }消费者:
Javapublic static void main(String[] args) { String queueName = "simple.queue"; ConnectionFactory factory = new ConnectionFactory(); factory.setHost("your_hostname"); factory.setPort(5672); factory.setVirtualHost("/"); factory.setUsername("your_username"); factory.setPassword("your_password"); try (Connection connection = factory.newConnection(); Channel channel = connection.createChannel()) { channel.queueDeclare(queueName, false, false, false, null); channel.basicConsume(queueName, true, new DefaultConsumer(channel) { @Override public void handleDelivery(String consumerTag, Envelope envelope, AMQP.BasicProperties properties, byte[] body) { String message = new String(body, StandardCharsets.UTF_8); System.out.println(" [x] Received '" + message + "'"); } }); System.out.println(" [x] Waiting for messages."); } catch (Exception e) { e.printStackTrace(); } }
4. Spring AMQP
AMQP(Advanced Message Queuing Protocol,高级消息队列协议)是一种开放标准的应用层协议。Spring AMQP 是 Spring 框架对 AMQP 协议的集成支持,简化了基于 AMQP 的消息收发操作。
4.1. 基础示例
提示
需提前在 RabbitMQ 控制台中手动创建好 simple.queue 队列。
引入 Spring AMQP 依赖
XML<dependency> <groupId>org.springframework.boot</groupId> <artifactId>spring-boot-starter-amqp</artifactId> </dependency>配置 RabbitMQ 服务器信息
YAMLspring: rabbitmq: host: your_hostname port: 5672 virtual-host: / username: your_username password: your_password listener: simple: concurrency: 1 # 最小并发消费者数 max-concurrency: 10 # 最大并发消费者数 prefetch: 10 # 设置预取数量为 10生产者
Java@RestController @RequiredArgsConstructor public class Producer { private final RabbitTemplate rabbitTemplate; @GetMapping("producer") public void send() { rabbitTemplate.convertAndSend("simple.queue", "hello, spring amqp"); } }消费者
Java@Service @Slf4j public class Consumer { @RabbitListener(queues = "simple.queue") public void simpleQueueMessageHandler(String message) { log.info("receive simple queue message: {}", message); } }
4.2. Fanout Exchange
信息
除了可以在 RabbitMQ 控制台中手动创建队列,我们还可以直接在代码中创建声明交换机、队列及其绑定关系。Spring AMQP 为我们提供了声明 Bean 的方式来声明交换机、队列及其绑定关系。
依赖与基础示例中的相同;
Fanout Exchange、Queue、Binding 声明
Java@Configuration public class Declares { @Bean public FanoutExchange helloFanoutExchange() { return new FanoutExchange("hello-fanout-exchange"); } @Bean public Queue helloQueue1() { return new Queue("hello-queue-1"); } @Bean public Binding helloQueue1Binding(Queue helloQueue1, FanoutExchange helloFanoutExchange) { return BindingBuilder.bind(helloQueue1).to(helloFanoutExchange); } @Bean public Queue helloQueue2() { return new Queue("hello-queue-2"); } @Bean public Binding helloQueue2Binding(Queue helloQueue2, FanoutExchange helloFanoutExchange) { return BindingBuilder.bind(helloQueue2).to(helloFanoutExchange); } }上述代码的作用:
- 声明了一个
hello-fanout-exchangeFanout Exchange; - 声明了
hello-queue-1、hello-queue-2两个队列; - 将
hello-queue-1和hello-queue-2队列绑定到hello-fanout-exchangeExchange。
- 声明了一个
生产者
Java@RestController @RequiredArgsConstructor public class Producer { private final RabbitTemplate rabbitTemplate; @GetMapping("producer") public void send() { rabbitTemplate.convertAndSend("hello-fanout-exchange", "", "hello, spring amqp"); } }基础示例中生产者是直接向队列发送消息,这里我们改为向
hello-fanout-exchange交换机发送消息。消费者
Java@Service @Slf4j public class Consumer { @RabbitListener(queues = "hello-queue-1") public void helloQueue1Listener(String message) { log.info("hello-queue-1 received: {}", message); } @RabbitListener(queues = "hello-queue-2") public void helloQueue2Listener(String message) { log.info("hello-queue-2 received: {}", message); } }代码基本与基础示例相同,只不过现在监听的是两个队列。
4.3. Direct Exchange
信息
实际上 Spring AMQP 还支持直接通过 @RabbitListener 注解来声明交换机、队列及其绑定关系,而无需配置额外的 Bean,这种方式更为便捷。
依赖与基础示例中的相同;
生产者
Java@RestController @RequiredArgsConstructor public class Producer { private final RabbitTemplate rabbitTemplate; @GetMapping("producer") public void send() { rabbitTemplate.convertAndSend("hello-direct-exchange", "Alice", "hello, Alice"); rabbitTemplate.convertAndSend("hello-direct-exchange", "Benjamin", "hello, Benjamin"); rabbitTemplate.convertAndSend("hello-direct-exchange", "Charlotte", "hello, Charlotte"); } }代码基本与 Fanout Exchange 相同,但是我们需要额外为其指定 Routing Key。
消费者
Java@Service @Slf4j public class Consumer { @RabbitListener(bindings = @QueueBinding( value = @Queue(name = "hello-queue-1"), exchange = @Exchange(name = "hello-direct-exchange", type = ExchangeTypes.DIRECT), key = {"Alice", "Charlotte"})) public void helloQueue1Listener(String message) { log.info("hello-queue-1 received: {}", message); } @RabbitListener(bindings = @QueueBinding( value = @Queue(name = "hello-queue-2"), exchange = @Exchange(name = "hello-direct-exchange", type = ExchangeTypes.DIRECT), key = {"Benjamin", "Charlotte"})) public void helloQueue2Listener(String message) { log.info("hello-queue-2 received: {}", message); } }@RabbitListener注解中包含了交换机、队列及其绑定关系信息。
4.4. Topic Exchange
依赖与基础示例中的相同;
生产者
Java@RestController @RequiredArgsConstructor public class Producer { private final RabbitTemplate rabbitTemplate; @GetMapping("producer") public void send() { rabbitTemplate.convertAndSend("hello-topic-exchange", "china.news", "Get Rich Quick"); rabbitTemplate.convertAndSend("hello-topic-exchange", "china.weather", "Sunny"); rabbitTemplate.convertAndSend("hello-topic-exchange", "japan.news", "Raining"); } }消息的 Routing Key 由多个单词组成,各单词之间使用
.进行分割。消费者
Java@Service @Slf4j public class Consumer { @RabbitListener(bindings = @QueueBinding( value = @Queue(name = "hello-queue-1"), exchange = @Exchange(name = "hello-topic-exchange", type = ExchangeTypes.TOPIC), key = "china.#")) public void helloQueue1Listener(String message) { log.info("hello-queue-1 received: {}", message); } @RabbitListener(bindings = @QueueBinding( value = @Queue(name = "hello-queue-2"), exchange = @Exchange(name = "hello-topic-exchange", type = ExchangeTypes.TOPIC), key = "#.news")) public void helloQueue2Listener(String message) { log.info("hello-queue-2 received: {}", message); } }
4.5. 消息转换器
Spring AMQP 的对象消息转换器是由 org.springframework.amqp.support.converter.MessageConverter 来处理的。而默认实现是 SimpleMessageConverter,基于 JDK 的 ObjectOutputStream 完成序列化。
要替换其默认实现只需要定义一个 MessageConverter 类型的 Bean 即可。推荐使用 JSON 方式序列化:
引入依赖
XML<dependency> <groupId>com.fasterxml.jackson.core</groupId> <artifactId>jackson-databind</artifactId> </dependency>声明 Bean
Java@Bean public MessageConverter messageConverter() { return new Jackson2JsonMessageConverter(); }
测试代码:
Java
Map<String, Object> msg = new HashMap<>();
msg.put("name", "张三");
msg.put("age", 16);
rabbitTemplate.convertAndSend("object.queue", msg);
测试效果如下:
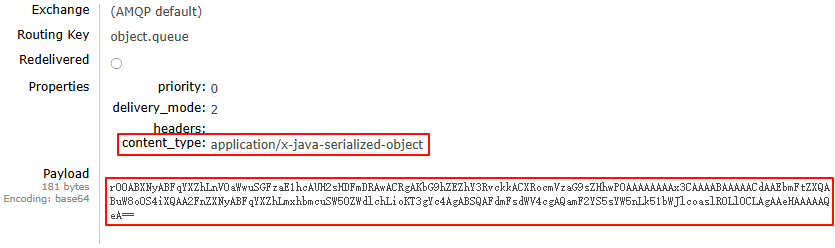
SimpleMessageConverter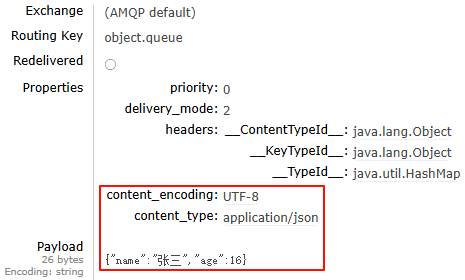
Jackson2JsonMessageConverter