Appearance
Spring In Action 6th:开发 Web 应用程序
1. 展示信息
1.1. 建立领域实体
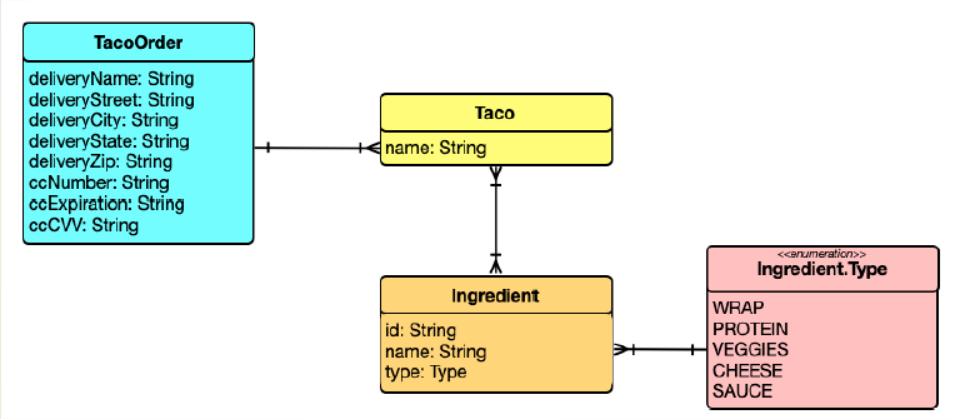
定义玉米卷的配料 Ingredient:
Java
package graceful.hello.spring.web.modules;

import lombok.Data;

@Data
public class Ingredient {
    private final String id;
    private final String name;
    private final Type type;

    public enum Type {
        WRAP, PROTEIN, VEGGIES, CHEESE, SAUCE
    }
}@Data 注释是由 Lombok 提供的,它告诉 Lombok 在编译时自动生成 Ingredient 的 Getter、Setter、equals()、hashCode() 以及 toString() 等有用的方法。以及接受所有 final 属性作为参数的构造函数。通过使用 Lombok,可以让 Ingredient 的代码保持整洁。
在使用 Lombok 之前需要先添加依赖:
XML
<dependency>
    <groupId>org.projectlombok</groupId>
    <artifactId>lombok</artifactId>
</dependency>因为 Lombok 是在编译时生效的,所以它不需要在运行时可用。我们可以排除它使它不出现在 JAR 或 WAR 文件中:
XML
<build>
    <plugins>
        <plugin>
            <groupId>org.springframework.boot</groupId>
            <artifactId>spring-boot-maven-plugin</artifactId>
            <configuration>
                <excludes>
                    <exclude>
                        <groupId>org.projectlombok</groupId>
                        <artifactId>lombok</artifactId>
                    </exclude>
                </excludes>
            </configuration>
        </plugin>
    </plugins>
</build>除了需要添加 Lombok 依赖之外,还需要为 IDE 添加 Lombok 扩展,否则 IDE 将会报错缺少方法和没有设置的最终属性。可以访问 https://projectlombok.org/ 了解如何在 IDE 中安装 Lombok。
定义 Taco 实体类:
Java
package graceful.hello.spring.web.modules;

import lombok.Data;

import java.util.List;

@Data
public class Taco {
    private String name;
    private List<Ingredient> ingredients;
}定义 TacoOrder 实体类:
Java
package graceful.hello.spring.web.modules;

import lombok.Data;

import java.util.ArrayList;
import java.util.List;

@Data
public class TacoOrder {
    private String deliveryName;
    private String deliveryStreet;
    private String deliveryCity;
    private String deliveryState;
    private String deliveryZip;
    private String ccNumber;
    private String ccExpiration;
    private String ccCVV;

    private List<Taco> tacos = new ArrayList<>();

    public void addTaco(Taco taco) {
        this.tacos.add(taco);
    }
}1.2. 创建控制器类
控制器是 Spring MVC 框架的主要参与者。它们的主要工作是处理 HTTP 请求,或者将请求传递给视图以呈现 HTML(浏览器显示),或者直接将数据写入响应体(RESTful)。
对于 Taco Cloud 应用程序,需要一个简单的控制器来执行以下操作:
- 处理请求路径为
/design的 HTTP GET 请求; - 构建配料列表;
- 将请求和配料数据提交给视图模板,以 HTML 的形式呈现并发送给请求的 Web 浏览器;
下面的 DesignTacoController 类处理这些需求。
Java
package graceful.hello.spring.web.controllers;

import graceful.hello.spring.web.modules.Ingredient;
import graceful.hello.spring.web.modules.Ingredient.Type;
import graceful.hello.spring.web.modules.Taco;
import graceful.hello.spring.web.modules.TacoOrder;
import lombok.extern.slf4j.Slf4j;
import org.springframework.stereotype.Controller;
import org.springframework.ui.Model;
import org.springframework.web.bind.annotation.*;

import java.util.Arrays;
import java.util.List;
import java.util.stream.Collectors;

@Slf4j
@Controller
@RequestMapping("/design")
@SessionAttributes("tacoOrder")
public class DesignTacoController {
    @ModelAttribute
    public void addIngredientsToModel(Model model) {
        List<Ingredient> ingredients = Arrays.asList(
                new Ingredient("FLTO", "Flour Tortilla", Type.WRAP),
                new Ingredient("COTO", "Corn Tortilla", Type.WRAP),
                new Ingredient("GRBF", "Ground Beef", Type.PROTEIN),
                new Ingredient("CARN", "Carnitas", Type.PROTEIN),
                new Ingredient("TMTO", "Diced Tomatoes", Type.VEGGIES),
                new Ingredient("LETC", "Lettuce", Type.VEGGIES),
                new Ingredient("CHED", "Cheddar", Type.CHEESE),
                new Ingredient("JACK", "Monterrey Jack", Type.CHEESE),
                new Ingredient("SLSA", "Salsa", Type.SAUCE),
                new Ingredient("SRCR", "Sour Cream", Type.SAUCE)
        );

        Type[] types = Type.values();
        for (Type type : types) {
            model.addAttribute(type.toString().toLowerCase(),
                    filterByType(ingredients, type));
        }
    }

    @ModelAttribute(name = "tacoOrder")
    public TacoOrder order() {
        return new TacoOrder();
    }

    @ModelAttribute(name = "taco")
    public Taco taco() {
        return new Taco();
    }

    @GetMapping
    public String showDesignForm() {
        return "design";
    }

    private Iterable<Ingredient> filterByType(
            List<Ingredient> ingredients, Type type) {
        return ingredients
                .stream()
                .filter(x -> x.getType().equals(type))
                .collect(Collectors.toList());
    }
}@Slf4j(第 16 行),它是 Lombok 提供的注解,在编译时将自动生成类中的 SLF4J(Simple Logging Facade for Java)记录器。该注解与以下代码具有相同的效果:
Java
private static final org.slf4j.Logger log =
org.slf4j.LoggerFactory.getLogger(DesignTacoController.class);@Controller 注解(第 17 行)用于将该类标识为控制器并将其标记为组件扫描的候选对象,以便 Spring 将发现该类并在 Spring 应用程序上下文中自动创建 DesignTacoController 实例作为 bean。
@RequestMapping 注解(第 18 行)在类级应用时,指定该控制器处理的请求的类型。在本例中,它指定 DesignTacoController 将处理路径以 /design 开头的请求。
@SessionAttributes("tacoOrder") 注解(第 19 行)表示稍后在类中放入模型的 TacoOrder 对象应该在会话中维护。这很重要,因为创建 taco 也是创建订单的第一步,我们创建的订单需要在会话中保持,以便它可以跨多个请求。
@GetMapping 注解(第 53 行)与类级 @RequestMapping 搭配使用使其更细化,指定当接收到针对 /design 的 HTTP GET 请求时,Spring MVC 将调用 showDesignForm() 来处理请求。@GetMapping 只是一系列请求映射注解中的一个。表 1.1 列出了 Spring MVC 中提供的部分请求映射注解:
| 注解 | 描述 |
|---|---|
@RequestMapping | 通用请求处理 |
@GetMapping | 处理 HTTP GET 请求 |
@PostMapping | 处理 HTTP POST 请求 |
@PutMapping | 处理 HTTP PUT 请求 |
@DeleteMapping | 处理 HTTP DELETE 请求 |
@PatchMapping | 处理 HTTP PATCH 请求 |
showDesignForm() 处理 /design 的 GET 请求时并没有太多操作。主要功能是返回一个字符串值 "design",这是将模型呈现到浏览器中的视图的逻辑名称。但在执行此操作之前,它还会在给定的 Model 中的 "taco" 键填充一个空的 Taco 对象。这将使表单在其上创建 Taco 杰作时拥有一个空白的 “画布”。
还有一个名为 addIngredientsToModel() 的方法,它带有 @ModelAttribute 注解。当处理请求时,此方法也将被调用,并构建一个 Ingredient 对象列表放入 Model 中。
配料类型列表将作为属性添加到将传递给 showDesignForm() 的 Model 对象中。Model 是在控制器和负责呈现数据的视图之间传递数据的对象。最终,放入 Model 属性的数据会被复制到 Servlet 请求属性中,在视图可以找到它们,并用于在用户浏览器中呈现页面。
addIngredientsToModel() 后面还有两个使用 @ModelAttribute 注解的方法。这些方法更简单,只创建一个新的 TacoOrder 和 Taco 对象,并将它们放入模型中。TacoOrder 对象在之前的 @SessionAttributes 注解中引用,它保存了用户在多个请求中创建 tacos 时正在构建的订单的状态。Taco 对象被放入模型中,以便在响应 /design 的 GET 请求时,渲染的视图将有一个非空对象可供显示。
如果现在运行应用程序并将浏览器指向 /design 路径,DesignTacoController 的 showDesignForm() 和 addIngredientsToModel() 将被调用,将配料和一个空的 Taco 放入 Model 中,然后将请求传递给视图。但是因为还没有定义视图,所以将会得到 HTTP 500(Internal Server Error)错误。
1.3. 设计视图
Spring 提供了几个很好的定义视图的选项,包括 JavaServer Pages (JSP)、Thymeleaf、FreeMarker、Mustache 和基于 Groovy 的模板。我们之前已经将 Thymeleaf 添加为依赖项。在运行时,Spring Boot 自动配置将看到 Thymeleaf 位于类路径中,并将自动创建支持 Spring MVC 的 Thymeleaf 视图的 bean。
像 Thymeleaf 这样的视图库被设计为与任何特定的 Web 框架解耦。因此,它们不知道 Spring 的模型抽象,无法处理控制器放入 Model 中的数据。但是,它们可以处理 Servlet 请求属性。因此,在 Spring 将请求交给视图之前,它将模型数据复制到 Thymeleaf 和其他视图模板选项可以轻松访问的请求属性中。
如果有一个请求属性,其键是 "message",并且你希望它被 Thymeleaf 渲染到 HTML <p> 标签中,你可以在 Thymeleaf 模板中编写以下内容:
XML
<p th:text="${message}">placeholder message</p>当模板被呈现为 HTML 时,<p> 元素的主体将被 Servlet 请求属性的值替换,其键值为 message。th:text 是一个 Thymeleaf 的命名空间属性,用于需要执行替换的地方。${} 操作符告诉它使用请求属性的值(在本例中为 message)。
Thymeleaf 还提供了另一个属性 th:each,它遍历元素集合,为集合中的每个项目呈现一次 HTML。例如,要呈现 wrap 配料列表,可以使用以下 HTML 片段:
HTML
<h3>Designate your wrap:</h3>
<div th:each="ingredient : ${wrap}">
  <input th:field="*{ingredients}" type="checkbox" th:value="${ingredient.id}"/>
  <span th:text="${ingredient.name}">INGREDIENT</span><br/>
</div>我们在 <div> 标签中填充 th:each 属性,用来对发现于 wrap 请求属性中的集合中的每一个项目进行重复呈现。在每次迭代中,成分项都绑定到一个名为 ingredient 的 Thymeleaf 变量中。
在 <div> 元素内部,有一个复选框 <input> 元素和一个 <span> 元素,用于为复选框提供标签。复选框使用 Thymeleaf 的 th:value 元素,它将把 <input> 元素的 value 属性呈现为在成分 id 属性中找到的值。<span> 元素使用 th:text 属性把 INGREDIENT 占位符替换为成分 name 属性的值。
当使用实际的模型数据呈现时,这个 <div> 循环迭代一次可能是这样的:
HTML
<div>
  <input name="ingredients" type="checkbox" value="FLTO" />
  <span>Flour Tortilla</span><br/>
</div>完整的 Thymeleaf 模板如下所示:
HTML
<!DOCTYPE html>
<html xmlns="http://www.w3.org/1999/xhtml"
      xmlns:th="http://www.thymeleaf.org">
<head>
    <title>Taco Cloud</title>
    <link rel="stylesheet" th:href="@{/styles.css}"/>
</head>

<body>
<h1>Design your taco!</h1>
<img th:src="@{/images/TacoCloud.png}"/>
<form method="POST" th:object="${taco}">
    <div class="grid">
        <div class="ingredient-group" id="wraps">
            <h3>Designate your wrap:</h3>
            <div th:each="ingredient : ${wrap}">
                <input th:field="*{ingredients}" type="checkbox" th:value="${ingredient.id}"/>
                <span th:text="${ingredient.name}">INGREDIENT</span><br/>
            </div>
        </div>
        <div class="ingredient-group" id="proteins">
            <h3>Pick your protein:</h3>
            <div th:each="ingredient : ${protein}">
                <input th:field="*{ingredients}" type="checkbox" th:value="${ingredient.id}"/>
                <span th:text="${ingredient.name}">INGREDIENT</span><br/>
            </div>
        </div>
        <div class="ingredient-group" id="cheeses">
            <h3>Choose your cheese:</h3>
            <div th:each="ingredient : ${cheese}">
                <input th:field="*{ingredients}" type="checkbox" th:value="${ingredient.id}"/>
                <span th:text="${ingredient.name}">INGREDIENT</span><br/>
            </div>
        </div>
        <div class="ingredient-group" id="veggies">
            <h3>Determine your veggies:</h3>
            <div th:each="ingredient : ${veggies}">
                <input th:field="*{ingredients}" type="checkbox" th:value="${ingredient.id}"/>
                <span th:text="${ingredient.name}">INGREDIENT</span><br/>
            </div>
        </div>
        <div class="ingredient-group" id="sauces">
            <h3>Select your sauce:</h3>
            <div th:each="ingredient : ${sauce}">
                <input th:field="*{ingredients}" type="checkbox" th:value="${ingredient.id}"/>
                <span th:text="${ingredient.name}">INGREDIENT</span><br/>
            </div>
        </div>
    </div>
    <div>
        <h3>Name your taco creation:</h3>
        <input type="text" th:field="*{name}"/><br/>
        <button>Submit your taco</button>
    </div>
</form>
</body>
</html>现在可以运行应用程序并将浏览器指向 /design 路径进行浏览。不过此时如果点击 “Submit your taco” 按钮将会引发一个 HTTP 405 错误:请求方法 “POST” 不受支持。
2. 处理表单提交
如果在视图中查看 <form> 标签,可以看到它的 method 属性被设置为 POST。而且,<form> 没有声明 action 属性。这意味着在提交表单时,浏览器将收集表单中的所有数据,并通过 HTTP POST 请求将其发送到服务器,发送到显示表单的 GET 请求的同一路径 —— /design。
因此,需要在该 POST 请求的接收端上有一个控制器处理程序方法。需要在 DesignTacoController 中编写一个新的处理程序方法来处理 /design 接口的 POST 请求。
可以使用 @PostMapping 处理 POST 请求,下面将 processTaco() 方法添加到 DesignTacoController 中:
Java
@PostMapping
public String processTaco(Taco taco, @ModelAttribute TacoOrder tacoOrder) {
    tacoOrder.addTaco(taco);
    log.info("Processing taco: {}", taco);
    return "redirect:/orders/current";
}当应用到 processTaco() 方法时,@PostMapping 与类级别 @RequestMapping 相协调,以表明 processTaco() 应该处理 /design 接口的 POST 请求。
回顾之前视图的 HTML 代码,你会看到几个复选框元素,所有这些元素的名称都是 ingredients,还有一个名为 name 的文本输入元素。表单中的这些字段直接对应 Taco 类的 ingredients 和 name 属性。
表单上的 name 字段只需要捕获一个简单的文本值。因此,Taco 的 name 属性是 String 类型。ingredients 复选框也有文本值,但是因为它们可能被选择零个或多个,所以它们绑定的 ingredients 属性是一个 List<Ingredient>,它将捕获每个选中的成分。
但是等一下。如果 ingredients 复选框有文本(例如,String)值,但是 Taco 对象将成分列表表示为 List<Ingredient>,那么不是不匹配吗?如何将像 ["FLTO", "GRBF", "LETC"] 这样的文本列表绑定到一个 Ingredient 对象的列表上,这些对象不仅包含 ID,还包含描述性名称和成分类型?
这就是转换器派上用场的地方。转换器是任何实现了 Spring 的 Converter 接口并实现了其 convert() 方法的类,该方法接受一个值并将其转换为另一个值。要将 String 转换为 Ingredient,我们将使用 IngredientByIdConverter,如下所示:
Java
package graceful.hello.spring.web.converters;

import graceful.hello.spring.web.modules.Ingredient;
import graceful.hello.spring.web.modules.Ingredient.Type;
import org.springframework.core.convert.converter.Converter;
import org.springframework.stereotype.Component;

import java.util.HashMap;
import java.util.Map;

@Component
public class IngredientByIdConverter implements Converter<String, Ingredient> {
    private Map<String, Ingredient> ingredientMap = new HashMap<>();

    public IngredientByIdConverter() {
        ingredientMap.put("FLTO", new Ingredient("FLTO", "Flour Tortilla", Type.WRAP));
        ingredientMap.put("COTO", new Ingredient("COTO", "Corn Tortilla", Type.WRAP));
        ingredientMap.put("GRBF", new Ingredient("GRBF", "Ground Beef", Type.PROTEIN));
        ingredientMap.put("CARN", new Ingredient("CARN", "Carnitas", Type.PROTEIN));
        ingredientMap.put("TMTO", new Ingredient("TMTO", "Diced Tomatoes", Type.VEGGIES));
        ingredientMap.put("LETC", new Ingredient("LETC", "Lettuce", Type.VEGGIES));
        ingredientMap.put("CHED", new Ingredient("CHED", "Cheddar", Type.CHEESE));
        ingredientMap.put("JACK", new Ingredient("JACK", "Monterrey Jack", Type.CHEESE));
        ingredientMap.put("SLSA", new Ingredient("SLSA", "Salsa", Type.SAUCE));
        ingredientMap.put("SRCR", new Ingredient("SRCR", "Sour Cream", Type.SAUCE));
    }

    @Override
    public Ingredient convert(String id) {
        return ingredientMap.get(id);
    }
}请注意,IngredientByIdConverter 被注解为 @Component,使其可以在 Spring 应用程序上下文中被发现为一个 bean。将它们自动注册到 Spring MVC 中,以便在需要将请求参数转换为绑定属性时使用。
就像 showDesignForm() 方法一样,processTaco() 也是通过返回一个 String 值来结束的。就像 showDesignForm() 一样,返回的值表示将显示给用户的视图。但是不同的是,从 processTaco() 返回的值前缀是 redirect:,表示这是一个重定向视图。更具体地说,它表示在 processTaco() 完成后,用户的浏览器应该被重定向到相对路径 /orders/current。
这样做的目的在于,在创建了一个 taco 之后,用户将被重定向到一个订单表单,他们可以从中下订单。但是还没有一个控制器可以处理 /orders/current 的请求。
鉴于你现在对 @Controller、@RequestMapping 和 @GetMapping 的了解,你可以轻松地创建这样一个控制器。它可能看起来像下面的清单:
Java
package graceful.hello.spring.web.controllers;

import lombok.extern.slf4j.Slf4j;
import org.springframework.stereotype.Controller;
import org.springframework.web.bind.annotation.GetMapping;
import org.springframework.web.bind.annotation.RequestMapping;
import org.springframework.web.bind.annotation.SessionAttributes;

@Slf4j
@Controller
@RequestMapping("/orders")
@SessionAttributes("tacoOrder")
public class OrderController {
    @GetMapping("/current")
    public String orderForm() {
        return "orderForm";
    }
}类级别的 @RequestMapping 指定了此控制器中的任何请求处理方法都将处理路径以 /orders 开头的请求。当它与方法级别的 @GetMapping 结合时,它指定 orderForm() 方法将处理 /orders/current 的 HTTP GET 请求。
至于 orderForm() 方法本身,它非常基础,只返回一个逻辑视图名 orderForm。orderForm 视图由一个名为 orderForm.html 的 Thymeleaf 模板提供,下面将显示该模板:
HTML
<!DOCTYPE html>
<html xmlns="http://www.w3.org/1999/xhtml"
      xmlns:th="http://www.thymeleaf.org">
<head>
    <title>Taco Cloud</title>
    <link rel="stylesheet" th:href="@{/styles.css}"/>
</head>
<body>
<form method="POST" th:action="@{/orders}" th:object="${tacoOrder}">
    <h1>Order your taco creations!</h1>
    <img th:src="@{/images/TacoCloud.png}"/>
    <h3>Your tacos in this order:</h3>
    <a th:href="@{/design}" id="another">Design another taco</a><br/>
    <ul>
        <li th:each="taco : ${tacoOrder.tacos}">
            <span th:text="${taco.name}">taco name</span>
        </li>
    </ul>
    <h3>Deliver my taco masterpieces to...</h3>
    <label for="deliveryName">Name: </label>
    <input type="text" th:field="*{deliveryName}"/>
    <br/>
    <label for="deliveryStreet">Street address: </label>
    <input type="text" th:field="*{deliveryStreet}"/>
    <br/>
    <label for="deliveryCity">City: </label>
    <input type="text" th:field="*{deliveryCity}"/>
    <br/>
    <label for="deliveryState">State: </label>
    <input type="text" th:field="*{deliveryState}"/>
    <br/>
    <label for="deliveryZip">Zip code: </label>
    <input type="text" th:field="*{deliveryZip}"/>
    <br/>
    <h3>Here's how I'll pay...</h3>
    <label for="ccNumber">Credit Card #: </label>
    <input type="text" th:field="*{ccNumber}"/>
    <br/>
    <label for="ccExpiration">Expiration: </label>
    <input type="text" th:field="*{ccExpiration}"/>
    <br/>
    <label for="ccCVV">CVV: </label>
    <input type="text" th:field="*{ccCVV}"/>
    <br/>
    <input type="submit" value="Submit Order"/>
</form>
</body>
</html>注意,这里的 <form> 标签与 design.html 使用的 <form> 标签不同,因为它还指定了一个表单操作。如果没有指定操作,表单将提交一个 HTTP POST 请求,返回到呈现表单的同一 URL。但是在这里,你指定表单应该 POST 到 /orders(使用 Thymeleaf 的 @{…} 操作符表示上下文相关路径)。
因此,你需要在你的 OrderController 类中添加另一个处理 /orders 的 POST 请求的方法:
Java
@PostMapping
public String processOrder(TacoOrder order, SessionStatus sessionStatus) {
    log.info("Order submitted: {}", order);
    sessionStatus.setComplete();
    return "redirect:/";
}当调用 processOrder() 方法来处理提交的订单时,它会得到一个 TacoOrder 对象,该对象的属性绑定到提交的表单字段。processOrder() 方法在 SessionStatus 对象上调用了 setComplete(),确保会话被清理并准备好在用户下一次创建 taco 时接收新的订单。
现在打开浏览器,访问 http://localhost:8080/design,在表单中填写一些字段,然后按下提交订单按钮。在此过程中,将看到类似如下应用程序日志:
Text
Processing taco: Taco(name=abc, ingredients=[Ingredient(id=FLTO, name=Flour Tortilla, type=WRAP), Ingredient(id=CARN, name=Carnitas, type=PROTEIN), Ingredient(id=CHED, name=Cheddar, type=CHEESE), Ingredient(id=LETC, name=Lettuce, type=VEGGIES), Ingredient(id=SLSA, name=Salsa, type=SAUCE)])
Order submitted: TacoOrder(deliveryName=weirdo, deliveryStreet=China, deliveryCity=xm, deliveryState=hl, deliveryZip=000000, ccNumber=1234, ccExpiration=2999, ccCVV=0, tacos=[Taco(name=abc, ingredients=[Ingredient(id=FLTO, name=Flour Tortilla, type=WRAP), Ingredient(id=CARN, name=Carnitas, type=PROTEIN), Ingredient(id=CHED, name=Cheddar, type=CHEESE), Ingredient(id=LETC, name=Lettuce, type=VEGGIES), Ingredient(id=SLSA, name=Salsa, type=SAUCE)])])
3. 验证表单输入
执行表单验证的一种方法是在 processTaco() 和 processOrder() 方法中添加大量的 if/then 块,检查每个字段以确保其符合适当的验证规则。但这样做会很繁琐,难以阅读和调试。
幸运的是,Spring 支持 JavaBean 验证 API(也称为 JSR 303)。这使得声明验证规则变得简单,而不是在应用代码中明确编写声明逻辑。
要在 Spring MVC 中应用验证,您需要:
添加 Spring Validation starter 到构建中:
XML<dependency> <groupId>org.springframework.boot</groupId> <artifactId>spring-boot-starter-validation</artifactId> </dependency>如果您使用的是 Gradle,那么您需要的依赖关系是:
Gradleimplementation 'org.springframework.boot:spring-boot-starter-validation'在需要进行验证的类上声明验证规则,具体来说,是
Taco类;在需要验证的控制器方法中指定应该执行验证,具体来说,是
DesignTacoController的processTaco()方法和OrderController的processOrder()方法;修改表单视图以显示验证错误;
Validation API 提供了几个注解,可以放置在域对象的属性上以声明验证规则。Hibernate 对 Validation API 的实现添加了更多的验证注解。通过将 Spring Validation starter 添加到构建中,可以将两者都添加到项目中。
Note:在较早的 Spring Boot 版本中,Spring Validation starter 会自动与 web starter 一起包含。但是从 Spring Boot 2.3.0 开始,如果您打算应用验证,您需要显式将其添加到构建中。
3.1. 声明验证规则
Taco:
Java
package graceful.hello.spring.web.modules;

import lombok.Data;

import javax.validation.constraints.NotNull;
import javax.validation.constraints.Size;
import java.util.List;

@Data
public class Taco {
    @NotNull
    @Size(min = 5, message = "Name must be at least 5 characters long")
    private String name;

    @NotNull
    @Size(min = 1, message = "You must choose at least 1 ingredient")
    private List<Ingredient> ingredients;
}TacoOrder:
Java
package graceful.hello.spring.web.modules;

import lombok.Data;
import org.hibernate.validator.constraints.CreditCardNumber;

import javax.validation.constraints.Digits;
import javax.validation.constraints.NotBlank;
import javax.validation.constraints.Pattern;
import java.util.ArrayList;
import java.util.List;

@Data
public class TacoOrder {
    @NotBlank(message = "Delivery name is required")
    private String deliveryName;

    @NotBlank(message = "Street is required")
    private String deliveryStreet;

    @NotBlank(message = "City is required")
    private String deliveryCity;

    @NotBlank(message = "State is required")
    private String deliveryState;

    @NotBlank(message = "Zip code is required")
    private String deliveryZip;

    @CreditCardNumber(message = "Not a valid credit card number")
    private String ccNumber;

    @Pattern(regexp = "^(0[1-9]|1[0-2])([\\/])([2-9][0-9])$",
            message = "Must be formatted MM/YY")
    private String ccExpiration;

    @Digits(integer = 3, fraction = 0, message = "Invalid CVV")
    private String ccCVV;

    private List<Taco> tacos = new ArrayList<>();

    public void addTaco(Taco taco) {
        this.tacos.add(taco);
    }
}对于 @NotNull、@NotBlank、@Size、@Digits 以及 @Pattern 其实都比较简单没有什么需要特别解释的,比较特殊的是 @CreditCardNumber(第 29 行)它属于 Hibernate Validator 注解集合中的一个。该注解声明该属性的值必须是一个经过 Luhn 算法检查的有效信用卡号。这可以防止用户犯错或故意输入错误的数据,但不能保证信用卡号实际上被分配到一个帐户。
3.2. 在表单绑定时执行验证
现在您已经声明了如何验证 Taco 和 TacoOrder,但为了使其在控制器上生效,我们需要在相应的方法参数上添加 JavaBean 验证 API 的 @Valid 注解。
DesignTacoController:
Java
@PostMapping
public String processTaco(@Valid Taco taco, Errors errors,
                          @ModelAttribute TacoOrder tacoOrder) {
    if (errors.hasErrors()) {
        return "design";
    }

    tacoOrder.addTaco(taco);
    log.info("Processing taco: {}", taco);
    return "redirect:/orders/current";
}OrderController:
Java
@PostMapping
public String processOrder(@Valid TacoOrder order, Errors errors,
                           SessionStatus sessionStatus) {
    if (errors.hasErrors()) {
        return "orderForm";
    }

    log.info("Order submitted: {}", order);
    sessionStatus.setComplete();
    return "redirect:/";
}@Valid 注解告诉 Spring MVC 在绑定到提交的表单数据之后,在调用方法之前先对参数对象执行验证。如果存在任何验证错误,这些错误的详细信息将被捕获在一个 Errors 对象中。processTaco()、processOrder() 的前几行会查询 Errors 对象,通过调用它的 hasErrors() 方法检查是否有任何验证错误。如果有,则直接返回原视图名称,以便重新显示页面。
但是用户如何知道哪些错误需要纠正呢?除非在表单上指出错误,否则用户将不知道如何成功提交表单。
3.3. 显示验证错误
Thymeleaf 通过 fields 属性以及 th:errors 属性提供了方便的访问 Errors 对象的方法。例如,要在信用卡号字段上显示验证错误,您可以向订单表单模板添加一个 <span> 元素,使用这些错误引用,如下所示。
HTML
...
<label for="ccNumber">Credit Card #: </label>
<input type="text" th:field="*{ccNumber}"/>
<span class="validationError"
        th:if="${#fields.hasErrors('ccNumber')}"
        th:errors="*{ccNumber}">CC Num Error</span>
<br/>
...除了可以用于样式化错误以引起用户注意的 class 属性外,<span> 元素使用 th:if 属性来决定是否显示 <span>。fields 属性的 hasErrors() 方法检查 ccNumber 字段是否有任何错误。如果有,<span> 将被渲染。
th:errors 属性引用了 ccNumber 字段,并且假设该字段存在错误,它将使用验证消息替换 <span> 元素的占位符内容。
现在,Taco Cloud 控制器不仅显示和捕获输入,还验证信息是否符合一些基本的验证规则。让我们退后一步,重新考虑 HomeController,看看另一种实现方式。
4. 使用视图控制器
到目前为止,您已经为 Taco Cloud 应用程序编写了三个控制器。尽管每个控制器在应用程序的功能中都有着不同的目的,但它们基本上都遵循以下编程模型:
它们都使用
@Controller进行注释,表示它们是应该由 Spring 组件扫描自动发现并在 Spring 应用程序上下文中实例化为 Bean 的控制器类;除了
HomeController外,它们都在类级别使用@RequestMapping进行注释,以定义控制器将处理的基线请求模式;它们都有一个或多个使用
@GetMapping或@PostMapping进行注释的方法,以提供关于哪些方法应该处理哪些类型请求的具体信息;
您将编写的大多数控制器都将遵循这种模式。但是当控制器足够简单,不需要填充模型或处理输入,就像您的 HomeController 一样,还有另一种定义控制器的方式。请看下面的示例,了解如何声明视图控制器 —— 一个什么都不做,只是将请求转发到视图的控制器:
Java
package graceful.hello.spring.web;

import org.springframework.context.annotation.Configuration;
import org.springframework.web.servlet.config.annotation.ViewControllerRegistry;
import org.springframework.web.servlet.config.annotation.WebMvcConfigurer;

@Configuration
public class WebConfig implements WebMvcConfigurer {
    @Override
    public void addViewControllers(ViewControllerRegistry registry) {
        registry.addViewController("/").setViewName("home");
    }
}有关 WebConfig 最显著的一点是它实现了 WebMvcConfigurer 接口。WebMvcConfigurer 定义了用于配置 Spring MVC 的几个方法。即使它是一个接口,它为所有方法提供了默认实现,因此您只需要覆盖您需要的方法。在这种情况下,您覆盖了 addViewControllers()。
addViewControllers() 方法接收一个 ViewControllerRegistry,您可以使用它来注册一个或多个视图控制器。在这里,您在注册表上调用 addViewController() 传递 /,这是您的视图控制器将处理 GET 请求的路径。该方法返回一个 ViewControllerRegistration 对象,您立即调用 setViewName() 在其中指定 home 作为请求 / 时应转发到的视图。
就是这样,您只需在配置类中添加几行代码,就能替换 HomeController。您现在可以删除 HomeController,应用程序应该仍然像之前一样运行。唯一需要的其他更改是 HomeControllerTest,从 @WebMvcTest 注释中删除对 HomeController 的引用,以便测试类可以在没有错误的情况下编译。
Java
...
@WebMvcTest()
public class HomeControllerTest {
...
}在这里,您创建了一个新的 WebConfig 配置类来存储视图控制器的声明。但是,任何配置类都可以实现 WebMvcConfigurer 并覆盖 addViewController 方法。例如,您可以像这样将相同的视图控制器声明添加到引导类 WebApplication 中:
Java
package graceful.hello.spring.web;

import org.springframework.boot.SpringApplication;
import org.springframework.boot.autoconfigure.SpringBootApplication;
import org.springframework.web.servlet.config.annotation.ViewControllerRegistry;
import org.springframework.web.servlet.config.annotation.WebMvcConfigurer;

@SpringBootApplication
public class WebApplication implements WebMvcConfigurer {
    public static void main(String[] args) {
        SpringApplication.run(WebApplication.class, args);
    }

    @Override
    public void addViewControllers(ViewControllerRegistry registry) {
        registry.addViewController("/").setViewName("home");
    }
}通过扩展现有的配置类,您可以避免创建新的配置类,将项目的构件数量保持在较低水平。但我更喜欢为每种配置(Web、数据、安全等)创建一个新的配置类,以保持应用程序引导配置的干净和简单。
5. 选择视图模板库
Spring 是灵活的,支持许多常见的模板选项。除了一些小的例外情况外,您选择的模板库本身甚至不知道它正在与 Spring 一起工作。表 5.1 列出了 Spring Boot 自动配置支持的模板选项:
| 模板 | Spring Boot starter 依赖 |
|---|---|
| FreeMarker | spring-boot-starter-freemarker |
| Groovy templates | spring-boot-starter-groovy-templates |
| JavaServer Pages (JSP) | None (provided by Tomcat or Jetty) |
| Mustache | spring-boot-starter-mustache |
| Thymeleaf | spring-boot-starter-thymeleaf |
一般来说,您选择您想要的视图模板库,将其添加为构建中的依赖项,然后开始在 /templates 目录中编写模板(在 Maven 或 Gradle 项目的 src/main/resources 目录下)。Spring Boot 检测到您选择的模板库,并自动配置了为其服务于 Spring MVC 控制器的视图所需的组件。
例如,假设您想使用 Mustache 而不是 Thymeleaf。没问题。只需访问项目的 pom.xml 文件,并将 Thymeleaf 的依赖:
XML
<dependency>
    <groupId>org.springframework.boot</groupId>
    <artifactId>spring-boot-starter-thymeleaf</artifactId>
</dependency>替换为:
XML
<dependency>
    <groupId>org.springframework.boot</groupId>
    <artifactId>spring-boot-starter-mustache</artifactId>
</dependency>当然,您需要确保将所有模板都使用 Mustache 语法而不是 Thymeleaf 标签。以下 Thymeleaf 模板片段:
HTML
<div class="ingredient-group" id="wraps">
    <h3>Designate your wrap:</h3>
    <div th:each="ingredient : ${wrap}">
        <input th:field="*{ingredients}" type="checkbox" th:value="${ingredient.id}"/>
        <span th:text="${ingredient.name}">INGREDIENT</span><br/>
    </div>
</div>等效于 Mustache 模板的片段:
HTML
<div class="ingredient-group" id="wraps">
    <h3>Designate your wrap:</h3>
    {{#wrap}}
    <div>
        <input name="ingredients" type="checkbox" value="{{id}}"/>
        <span>{{name}}</span><br/>
    </div>
    {{/wrap}}
</div>{{#wrap}} 块(以 {{/wrap}} 结束)迭代请求属性中键为 wrap 的集合,并为每个项呈现嵌入的 HTML。{{id}} 和 {{name}} 标签引用项(Ingredient)的 id 和 name 属性。
在表 5.1 中,您会注意到 JSP 不需要构建中的任何特殊依赖项。这是因为 Servlet 容器本身(默认为 Tomcat)实现了 JSP 规范,因此不需要其他依赖项。
但是,如果选择使用 JSP,就会有一个要注意的地方。事实证明,Java Servlet 容器 —— 包括嵌入的 Tomcat 和 Jetty 容器——通常会在 /WEB-INF 下的某个地方查找 JSP。但是,如果您将应用程序构建为可执行的 JAR 文件,就无法满足该要求。因此,只有在将应用程序构建为 WAR 文件并将其部署在传统的 Servlet 容器中时,JSP 才是一个选择。如果您正在构建可执行的 JAR 文件,则必须选择表 5.1 中的其他选项。
5.1. 缓存模板
默认情况下,模板只在首次使用时解析一次,并且解析的结果会被缓存以供后续使用。这对于生产环境来说是一个很好的特性,因为它防止在每个请求上进行冗余的模板解析,从而提高性能。
然而,在开发时,这个特性可能不太理想。假设您启动应用程序,访问 taco 设计页面,并决定对其进行一些更改。当您刷新 Web 浏览器时,仍然会显示原始版本。您能够看到更改的唯一方法是重新启动应用程序,这相当不方便。
幸运的是,我们有一种方法可以禁用缓存。我们只需要将一个与模板相关的缓存属性设置为 false。表 5.2 列出了每个支持的模板库的缓存属性。
| 模板 | 缓存启用属性 |
|---|---|
| FreeMarker | spring.freemarker.cache |
| Groovy templates | spring.groovy.template.cache |
| Mustache | spring.mustache.cache |
| Thymeleaf | spring.thymeleaf.cache |
默认情况下,所有这些属性都设置为 true 以启用缓存。您可以通过将其缓存属性设置为 false 来禁用您选择的模板引擎的缓存。例如,要禁用 Thymeleaf 缓存,可以在 application.properties 中添加以下行:
Properties
spring.thymeleaf.cache=false唯一需要注意的是,在将应用程序部署到生产环境之前,确保删除此行(或将其设置为 true)。一种选择是在配置文件中设置该属性(我们将在《Spring In Action 6th:使用配置属性》中讨论配置文件)。
一个更简单的选择是使用 Spring Boot 的 DevTools,就像我们之前选择的那样。DevTools 提供了许多在开发时非常有用的功能,它会禁用所有模板库的缓存,但当您的应用程序部署时,它会禁用自身(从而重新启用模板缓存)。